Table of Contents
🎯 Who Should Use Slide Remote?
- Keynote Speakers & Lecturers Walk freely around the stage while presenting
- Students & Teachers Deliver classroom slides without holding a mouse
- Business Professionals Smooth PowerPoint & Google Slides pitch control
- Remote Workers Advance slides seamlessly during Zoom / Teams calls
Overview & Key Features
The days of carrying dedicated physical presentation clickers or staying tethered to your laptop keyboard are over. Slide Remote turns your iPhone or Android phone into a wireless presentation remote with zero physical hardware required. The mobile app sends taps directly to a lightweight companion app on your Mac over your local network.
15 Key Feature Highlights
Slide Remote is packed with everything you need for effortless, professional presentation delivery:
- 1. Phone as a Slide Clicker: Turn your iPhone or Android phone into a powerful wireless presentation remote without buying extra physical clickers.
- 2. One-Tap Slide Control: Advance or go back through slides instantly with dedicated, responsive Next and Previous buttons.
- 3. Black Screen Control: Quickly toggle a black screen during live presentations using the standard PowerPoint “B” shortcut.
- 4. End Presentation: Exit the slideshow remotely with a single tap, simulating the keyboard Esc key.
- 5. QR Code Pairing: Connect your phone to your Mac in seconds simply by scanning the QR code displayed on the Mac companion app.
- 6. Automatic Device Discovery: Automatically discover and connect to your Mac when both devices share the same local Wi-Fi network.
- 7. No IP Address Typing: Skip cumbersome IP configurations and Terminal commands with seamless zero-typing connection.
- 8. Multi-App Compatibility: Native support for Microsoft PowerPoint, Apple Keynote, Google Slides, PDF Viewers, and any app supporting standard navigation shortcuts.
- 9. Local Network Communication: Operates entirely over your local Wi-Fi network without requiring an active internet connection.
- 10. Mac Accessibility Integration: Leverages native macOS Accessibility permission to execute key commands securely in the active window.
- 11. Launch at Login: Set the companion app to auto-start when you log into your Mac so your remote is always ready.
- 12. Conference-Friendly Connection: Easily connect via your Mac's own hotspot when venue Wi-Fi blocks device-to-device communication (client isolation).
- 13. Secure Session Pairing: Generates fresh session tokens and QR codes every time to stop unauthorized devices on the network from controlling your presentation.
- 14. Simple Status Indicator: Instant visual feedback showing green when your phone is actively linked to your Mac.
- 15. Privacy-Focused: All data and signals stay strictly on your local network — no third-party servers, tracking, or cloud latency.
Presentation Software Compatibility
Turn Your Phone into a Presentation Clicker
Download Slide Remote on Android to control PowerPoint, Google Slides, & Keynote wirelessly.
Download Slide Remote Free on Google PlayOne-time setup & Launch at Login
On your Mac
- Download Slide Remote for Mac and move it into your Applications folder.
- Launch the app. It runs quietly in your macOS menu bar at the top of the screen.
- Grant macOS Accessibility Permission when prompted. This permission is essential so the app can simulate keypresses (Right Arrow, Left Arrow, B, Esc) on your slideshow.
- Turn on “Launch at Login” in the menu bar settings so the companion server is automatically active whenever you start your computer.
On your phone
Download and install Slide Remote from the Google Play Store or Apple App Store. No initial login or registration is required.
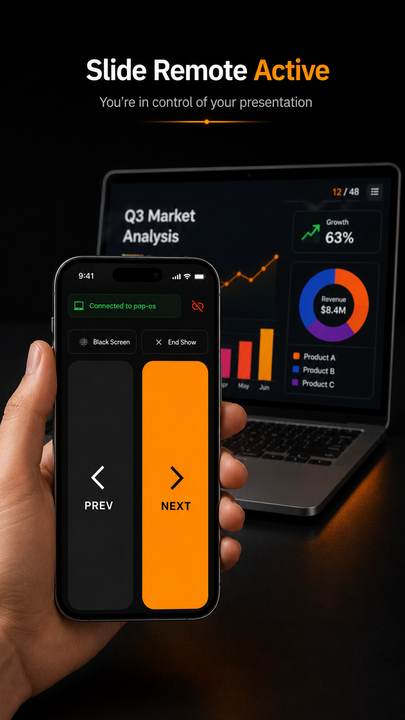
Slide Controls (Next, Prev, Black, Esc)
Once paired via QR Code or Auto Discovery, your phone acts as an intuitive control panel for your presentation:
- NEXT (→): Advances to the next slide or triggers the next animation.
- PREV (←): Returns to the previous slide.
- Black Screen (B): Instantly blacks out the screen so audience focus shifts to the speaker.
- End Show (Esc): Immediately exits full-screen presentation mode.
Conference-Friendly Wi-Fi Connection
At large conferences or hotel venues, public Wi-Fi networks frequently enforce client isolation, which prevents devices on the network from talking directly to each other.
The Conference Solution: Have your Mac create its own Wi-Fi network (System Settings → General → Sharing → Internet Sharing) and connect your phone directly to your Mac's Wi-Fi hotspot. This guarantees 100% reliable connection even in crowded venue environments.
Security, Privacy & Status Indicator
Slide Remote prioritizes security and privacy:
- Secure Session Pairing: Each connection uses a fresh QR code and pairing token so random network users cannot trigger slide changes on your Mac.
- Simple Status Indicator: The phone app displays a clear connection dot (Green for connected) so you never wonder if your clicker is active.
- 100% Local & Privacy-Focused: All commands stay within your local network — no analytics, no external servers, and no telemetry.
Troubleshooting & FAQs
- Slides don’t change when tapping buttons: Ensure macOS Accessibility permission is toggled ON under System Settings → Privacy & Security → Accessibility.
- Phone cannot discover Mac automatically: Verify both devices are connected to the exact same Wi-Fi network, or scan the QR code displayed in the Mac menu bar app.
- No IP address typing needed: You do not need to look up IP addresses or run terminal commands; QR code scanning and auto-discovery handle all pairing.